Furniture Restoration: Desk!
I have finally taken all of my Pinterest furniture inspiration and put it into play...
I did what everyone suggested and bought a very inexpensive piece that would not be too big of a heart break to completely mess up (if all failed). Thankfully.. I found this beauty on Craigslist for $20 dollars! I LOVED it and the price even more! Here it is...
With this being my very first solo restoration project... it was very hit and miss. The entire desk was a learning experience... from the sanding (You did see that I didn't write stripping..right? MISTAKE! lesson learned.) to the priming, to the painting, to the replacing of the hardware, and to the sealing of the whole *Sha bang*!
Well I began by sanding the entire thing. Well as i just stated I did not use a varnish stripper. Woah. Talk about an arm workout. BUT... after about 10 sheets of 60 grit sandpaper this baby was smooth and varnish free! Please excuse the white drawer..that was me experimenting with spary paint. (BAD IDEA! lesson learned.)
But isn't the wood just gorgeous?
Once I was finished sanding I stained the top of the desk with Minwax: Dark Walnut and sealed the stain with polyurethane: Semi-gloss finish.
After staining I primed the rest of the desk using KILZ and then added another coat. It was quite difficult to cover the already dark stained wood. New Lesson Learned: Use NEW or slightly used brushes to make sure that the primer is applied evenly. I may even try using the spray can version of KILZ to save time on my next project.
Once primed... I painted the bottom with Valspar's: Woodrow Wilson Presidential White. All in all it took about three coats to get the color I really wanted. On a side note.. I bought the paint without a gloss because I wanted to go for the antique look. Little did I know... this white paint would attract every piece of dirt, every bug, and every scratch possible in the garage. Thank goodness for Magic Erasers. Lesson Learned: Buy paint in a gloss form from now on!
Then, days later... I started working on the new hardware! I used the same color (Valspar's: Woodrow Wilson Presidential White) to paint over the pulls that I bought at Hobby Lobby for $1.50 a piece. They were 50% off the week that I bought them! After they dried I used 220 grit sandpaper to give then a distressed look.
I got the inspiration for this from Shanty 2 Chic, they are amazing DIY'ers.
 Before
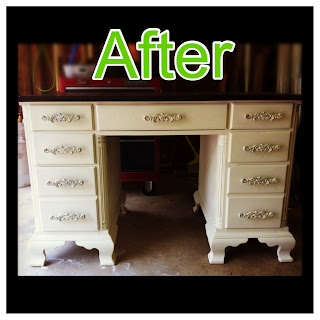
 After
After
I am really pleased with the these turned out!
After attaching the new hardware... Voila! The finished project! Although this piece took many HOT days in the southern heat I really love how it turned out!


